Wedding guest list — how to organize it without losing your mind
Organizing your wedding guest list doesn't have to be chaos. We walk you through, step by step, how to do it right, what information you need for each guest and how to manage it all from one place.

Few things cause more stress in wedding planning than the guest list. It starts as a round number in your head — "about 100 people" — and ends up becoming an endless Excel sheet, unanswered messages and the recurring question of "did my mom's side of the family confirm or not?".
The good news is that with a little order from the start, managing your guest list can be surprisingly simple. In this guide we explain how to do it right.
📋 Before you start — define your limits
The first thing isn't to make the list but to define two things:
1. The maximum number of guests This is dictated by your budget and the venue's capacity. Without a clear limit, the list will grow on its own and become impossible to control. Set the maximum number before inviting anyone.
2. The priority levels Not all guests carry the same weight. A useful way to organize them is into three groups:
- Tier A — Must-haves. Close family and best friends. They come no matter what.
- Tier B — Important but not critical. Friends, coworkers, distant family.
- Tier C — Waiting list. If spots are left over after confirming Tiers A and B, they get invited.
This system saves you from the dilemma of having to "un-invite" someone later.
📝 What information you need for each guest
Many couples make the mistake of building a list with names only. Later, when it's time to send invitations or confirm attendance, they're missing key information.
For each guest or group of guests, note down:
- Full name — or the family's name if it's a group
- Number of spots — how many people that invitation includes
- Side of the wedding — whether they're a guest of the bride, the groom or both
- Phone or WhatsApp — to send the invitation and follow up
- Email — useful for sending reminders
- Confirmation status — pending, confirmed or declined
With that information you have everything you need to manage your list from start to finish.
❌ The most common mistakes when organizing the list
Doing it in Excel or in your phone's notes It works at first, but once you have 80 or 100 guests it becomes impossible to keep updated. The filters, the statuses and the spots get complicated fast.
Not separating by side How many guests are the bride's and how many are the groom's? If you don't have that clear from the start, the negotiations over "who else to invite" get enormously complicated.
Not recording the spots per group Inviting "the Martínez family" without specifying how many people that invitation includes creates confusion — both for you and for them.
Waiting until the list is complete to start organizing it The list is never complete until the last moment. It's best to start organizing it from the very first name and keep it updated.
✅ How to organize it well — step by step
1. Start with the must-haves
Write your Tier A list first — the ones who are coming for sure. Don't worry about the total yet, just jot them down.
2. Group them correctly
Define whether each entry is:
- Individual — one person with their own name
- Couple — two people with specific names
- Family — a group with a defined number of spots
3. Assign the side of the wedding
Mark each guest as part of the bride's list, the groom's or both. This will help you keep the balance and organize the ceremony.
4. Record the contact
Note down the phone number of at least one person per group. Without that, sending the invitation and following up becomes very difficult.
5. Track the confirmations
Once the invitations are sent, update each guest's status. This lets you know at any moment how many people will actually attend.
📲 How to manage your guest list with Nupcii
Nupcii has a guest management system designed specifically for weddings, which saves you from the Excel chaos and gives you all the information you need in one place.
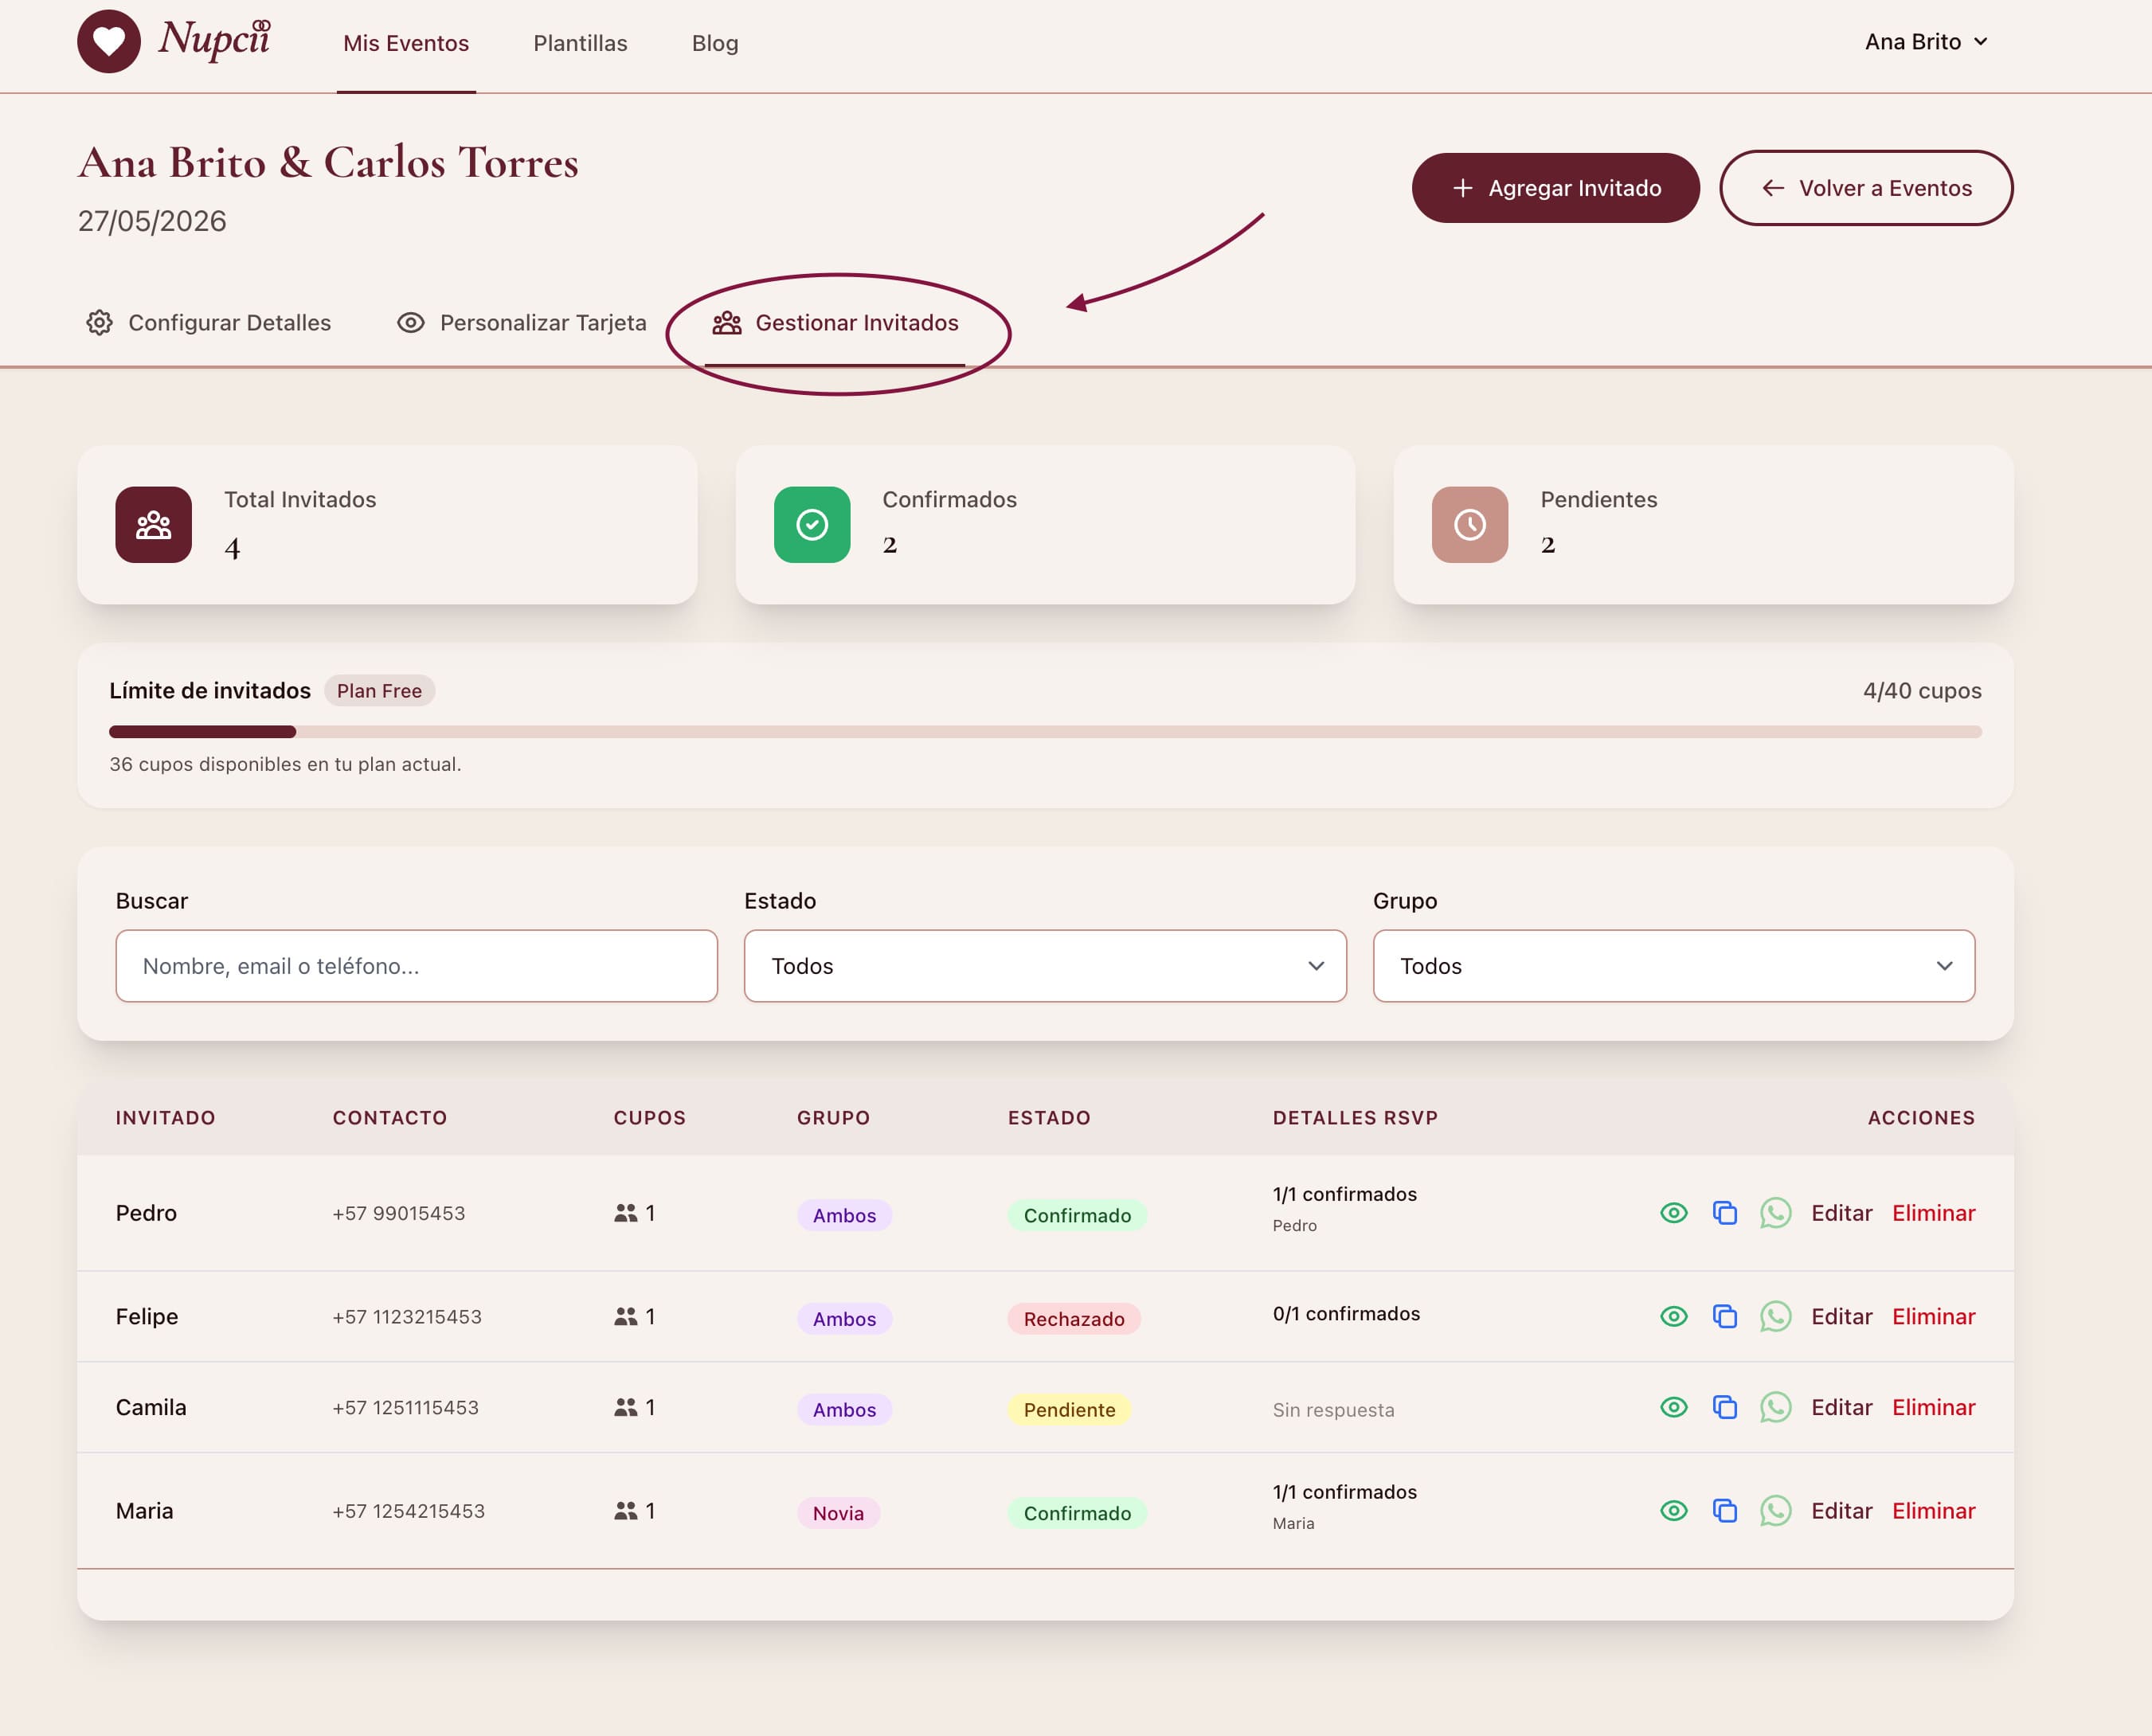
Step 1 — Create your event and go to the guests section
From your dashboard in Nupcii, enter your event and select the guests tab.
📸 
📸 
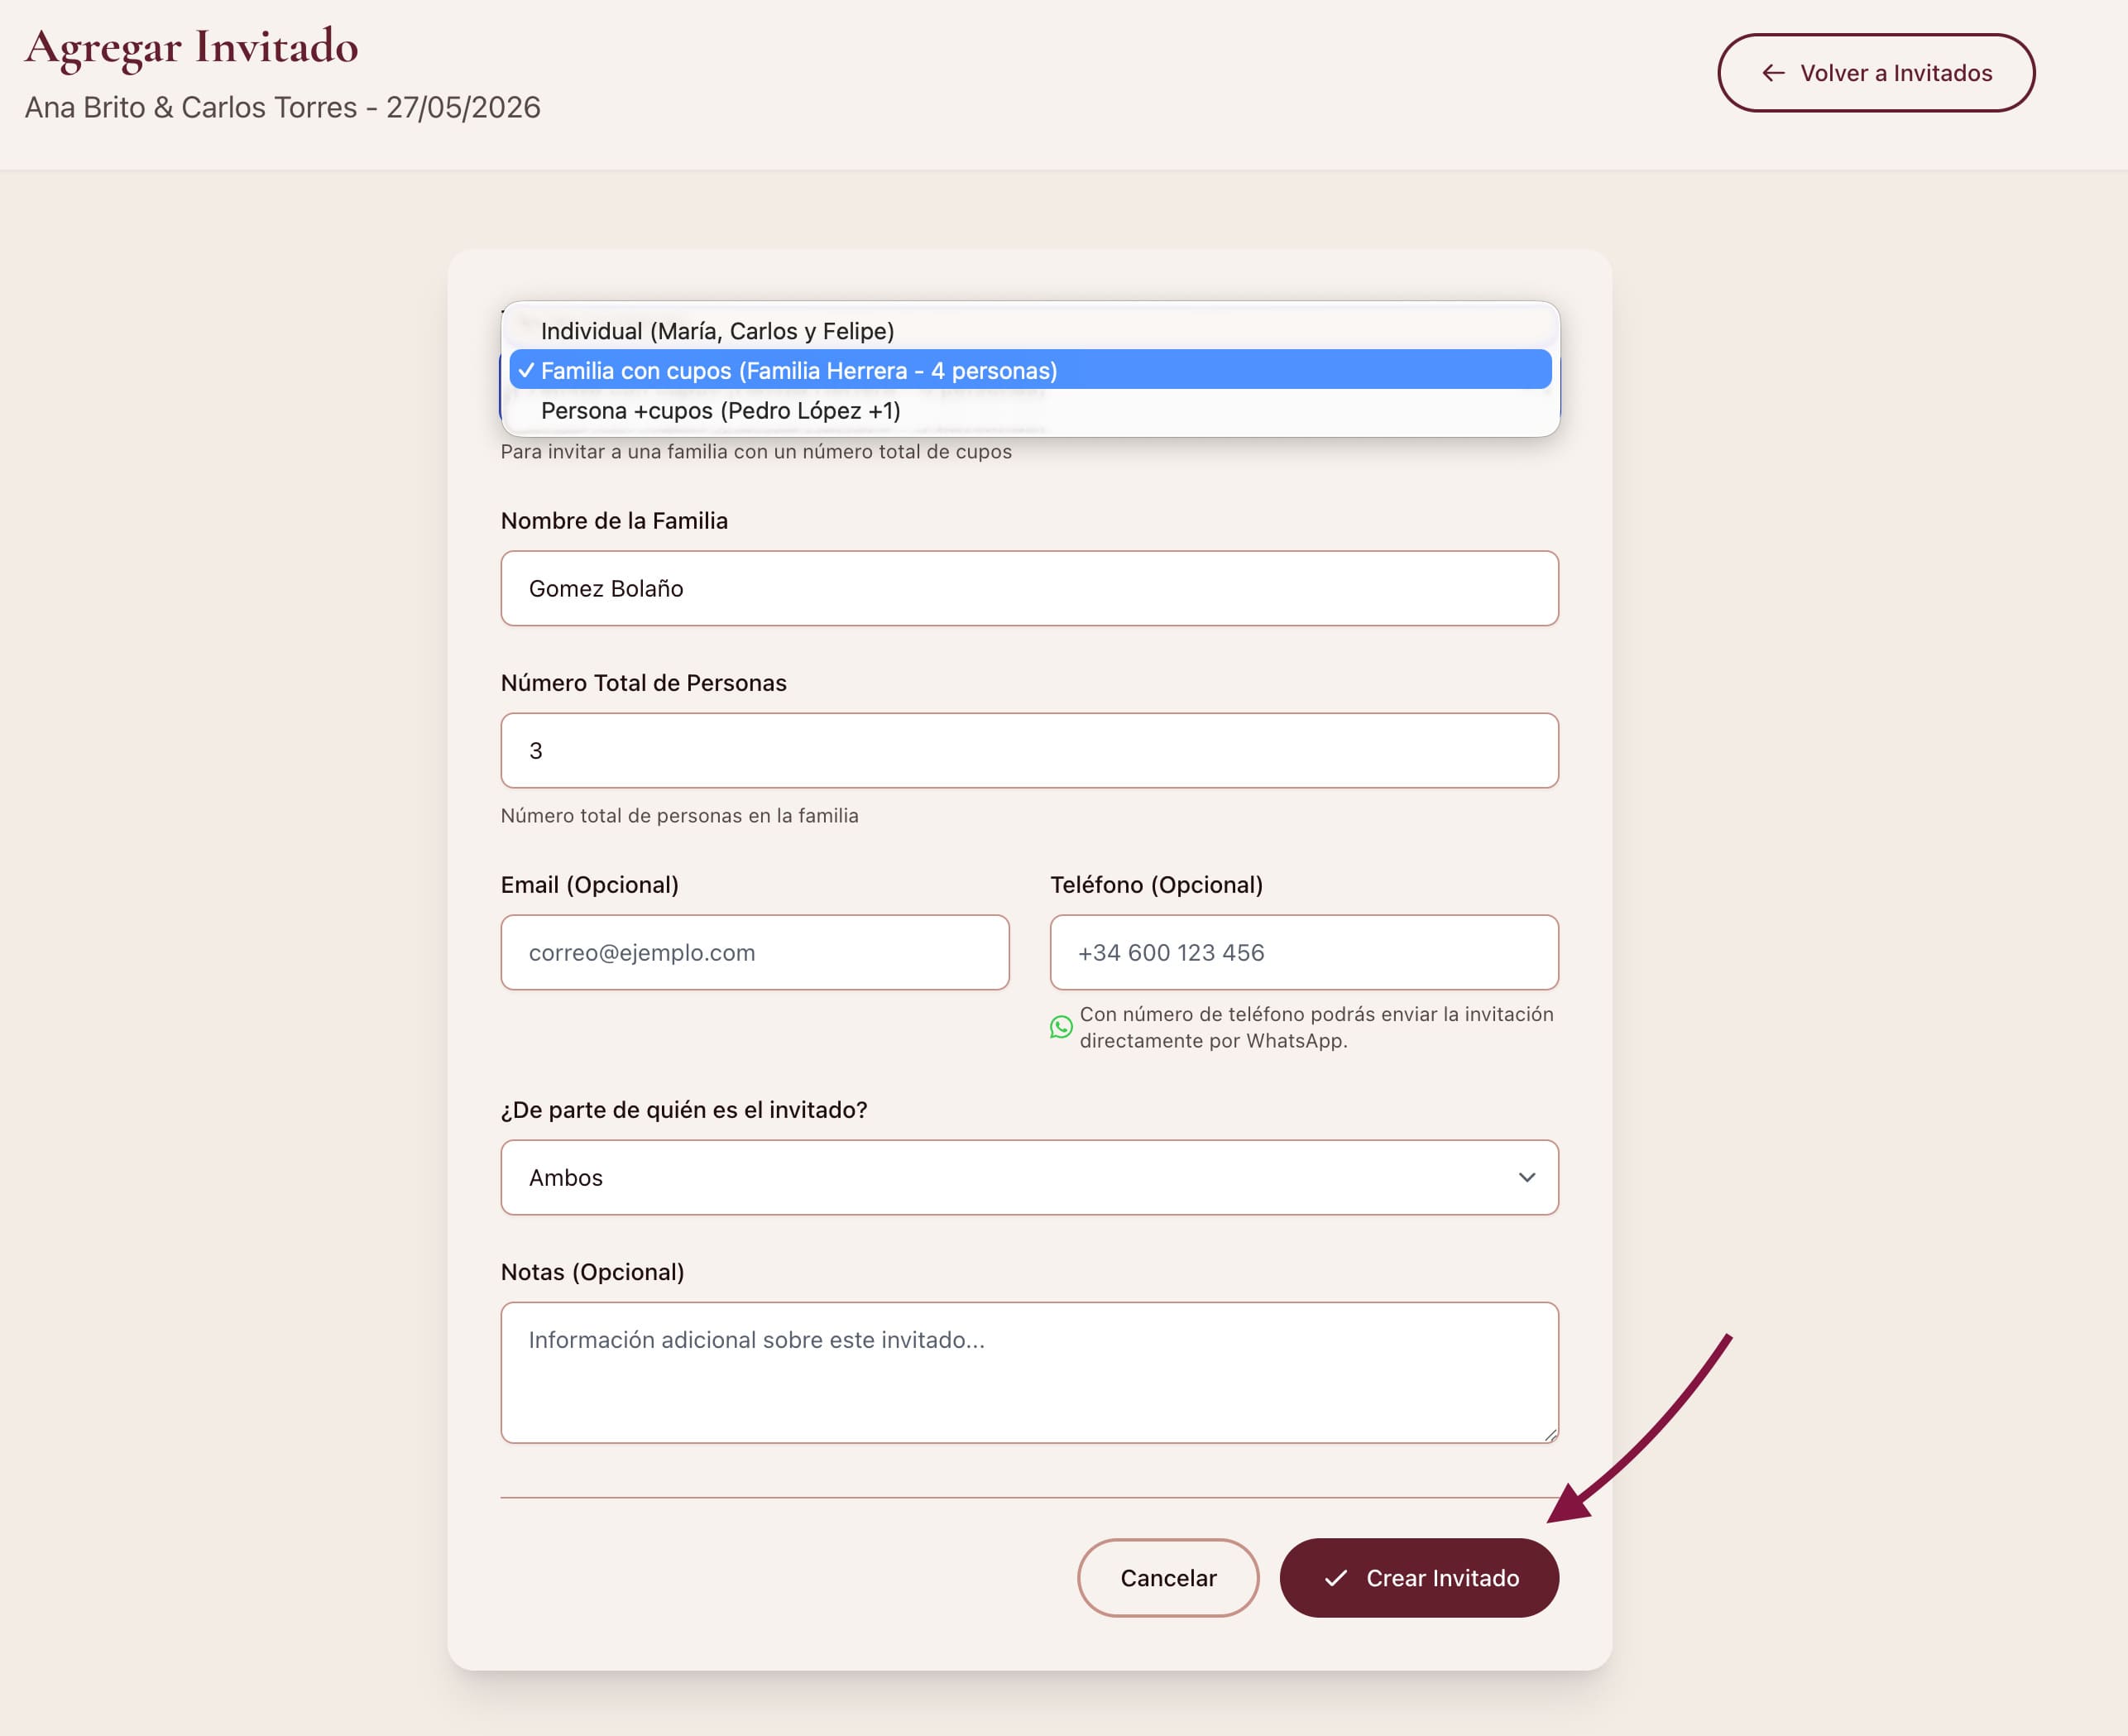
Step 2 — Choose the invitation type
When adding a guest, Nupcii lets you choose from three types:
- Individual — for one or several people with specific names
- Family — for a family group with a number of spots
- Plus one — for a person who can bring a companion
Step 3 — Fill in the guest's details
Add the name, the number of spots, the side of the wedding and the contact. Nupcii automatically generates a unique link for that invitation.
📸 
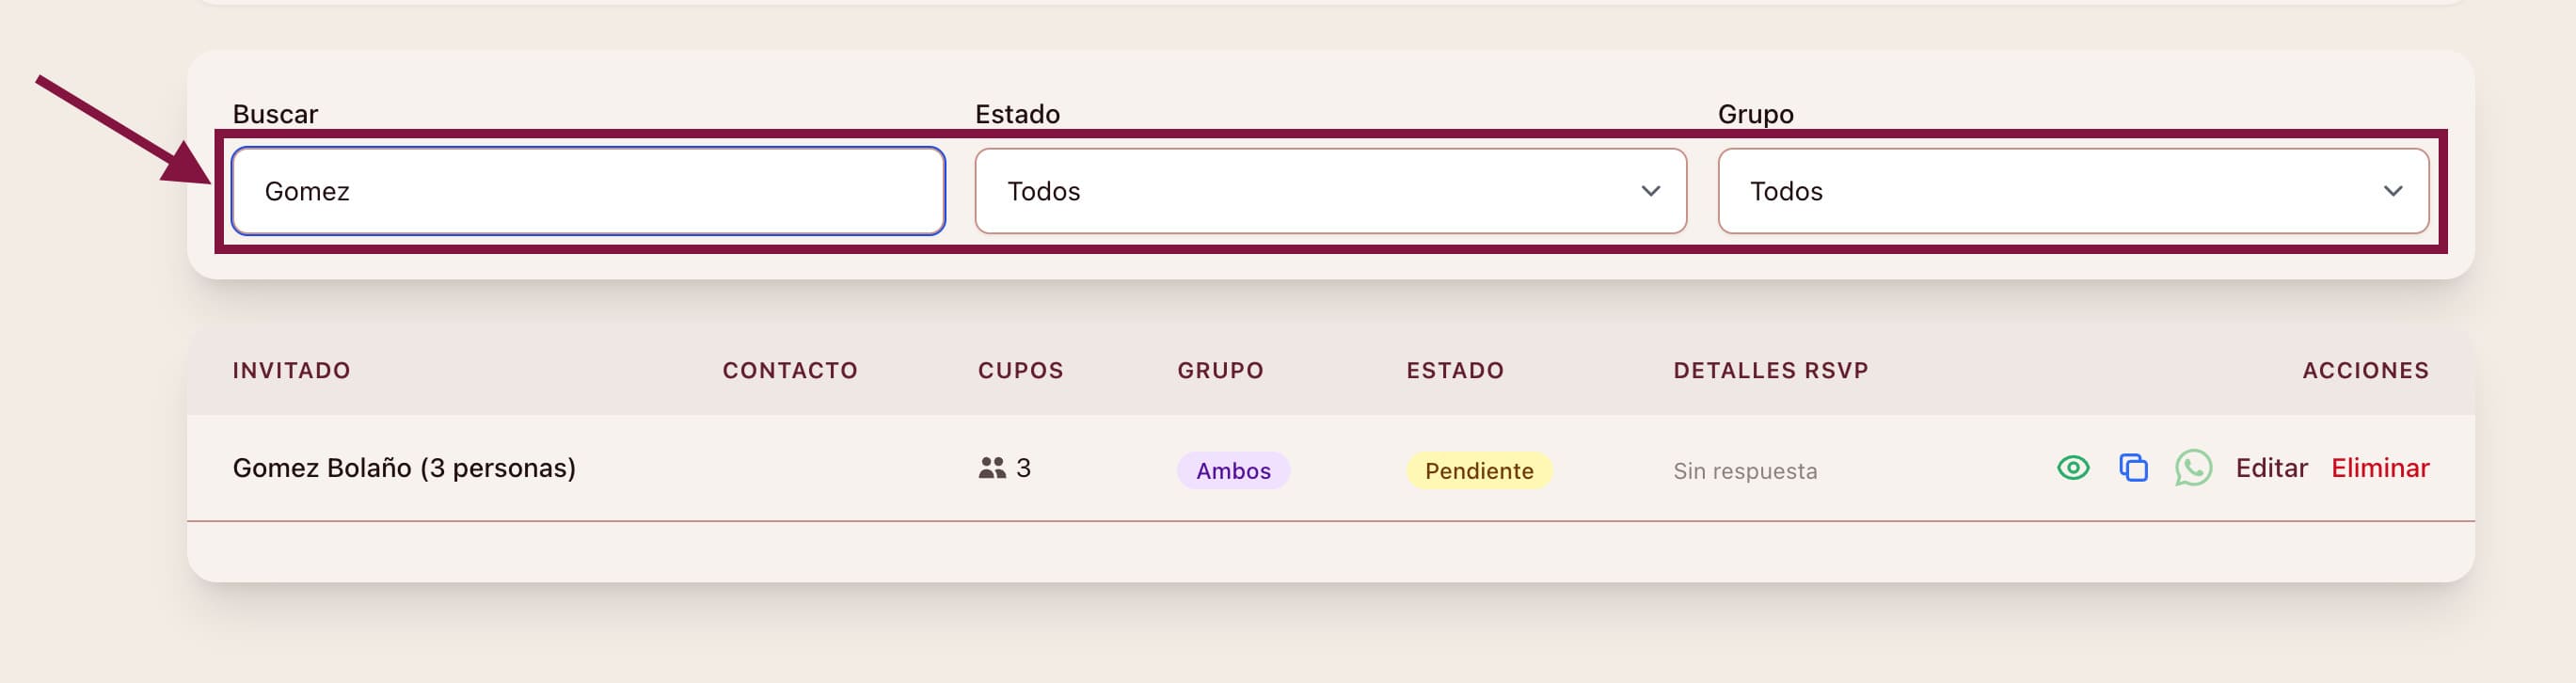
Step 4 — Filter and search whenever you need to
With a lot of guests, filters are your best friends. In Nupcii you can filter by confirmation status, by side of the wedding and search by name in seconds.
📸 
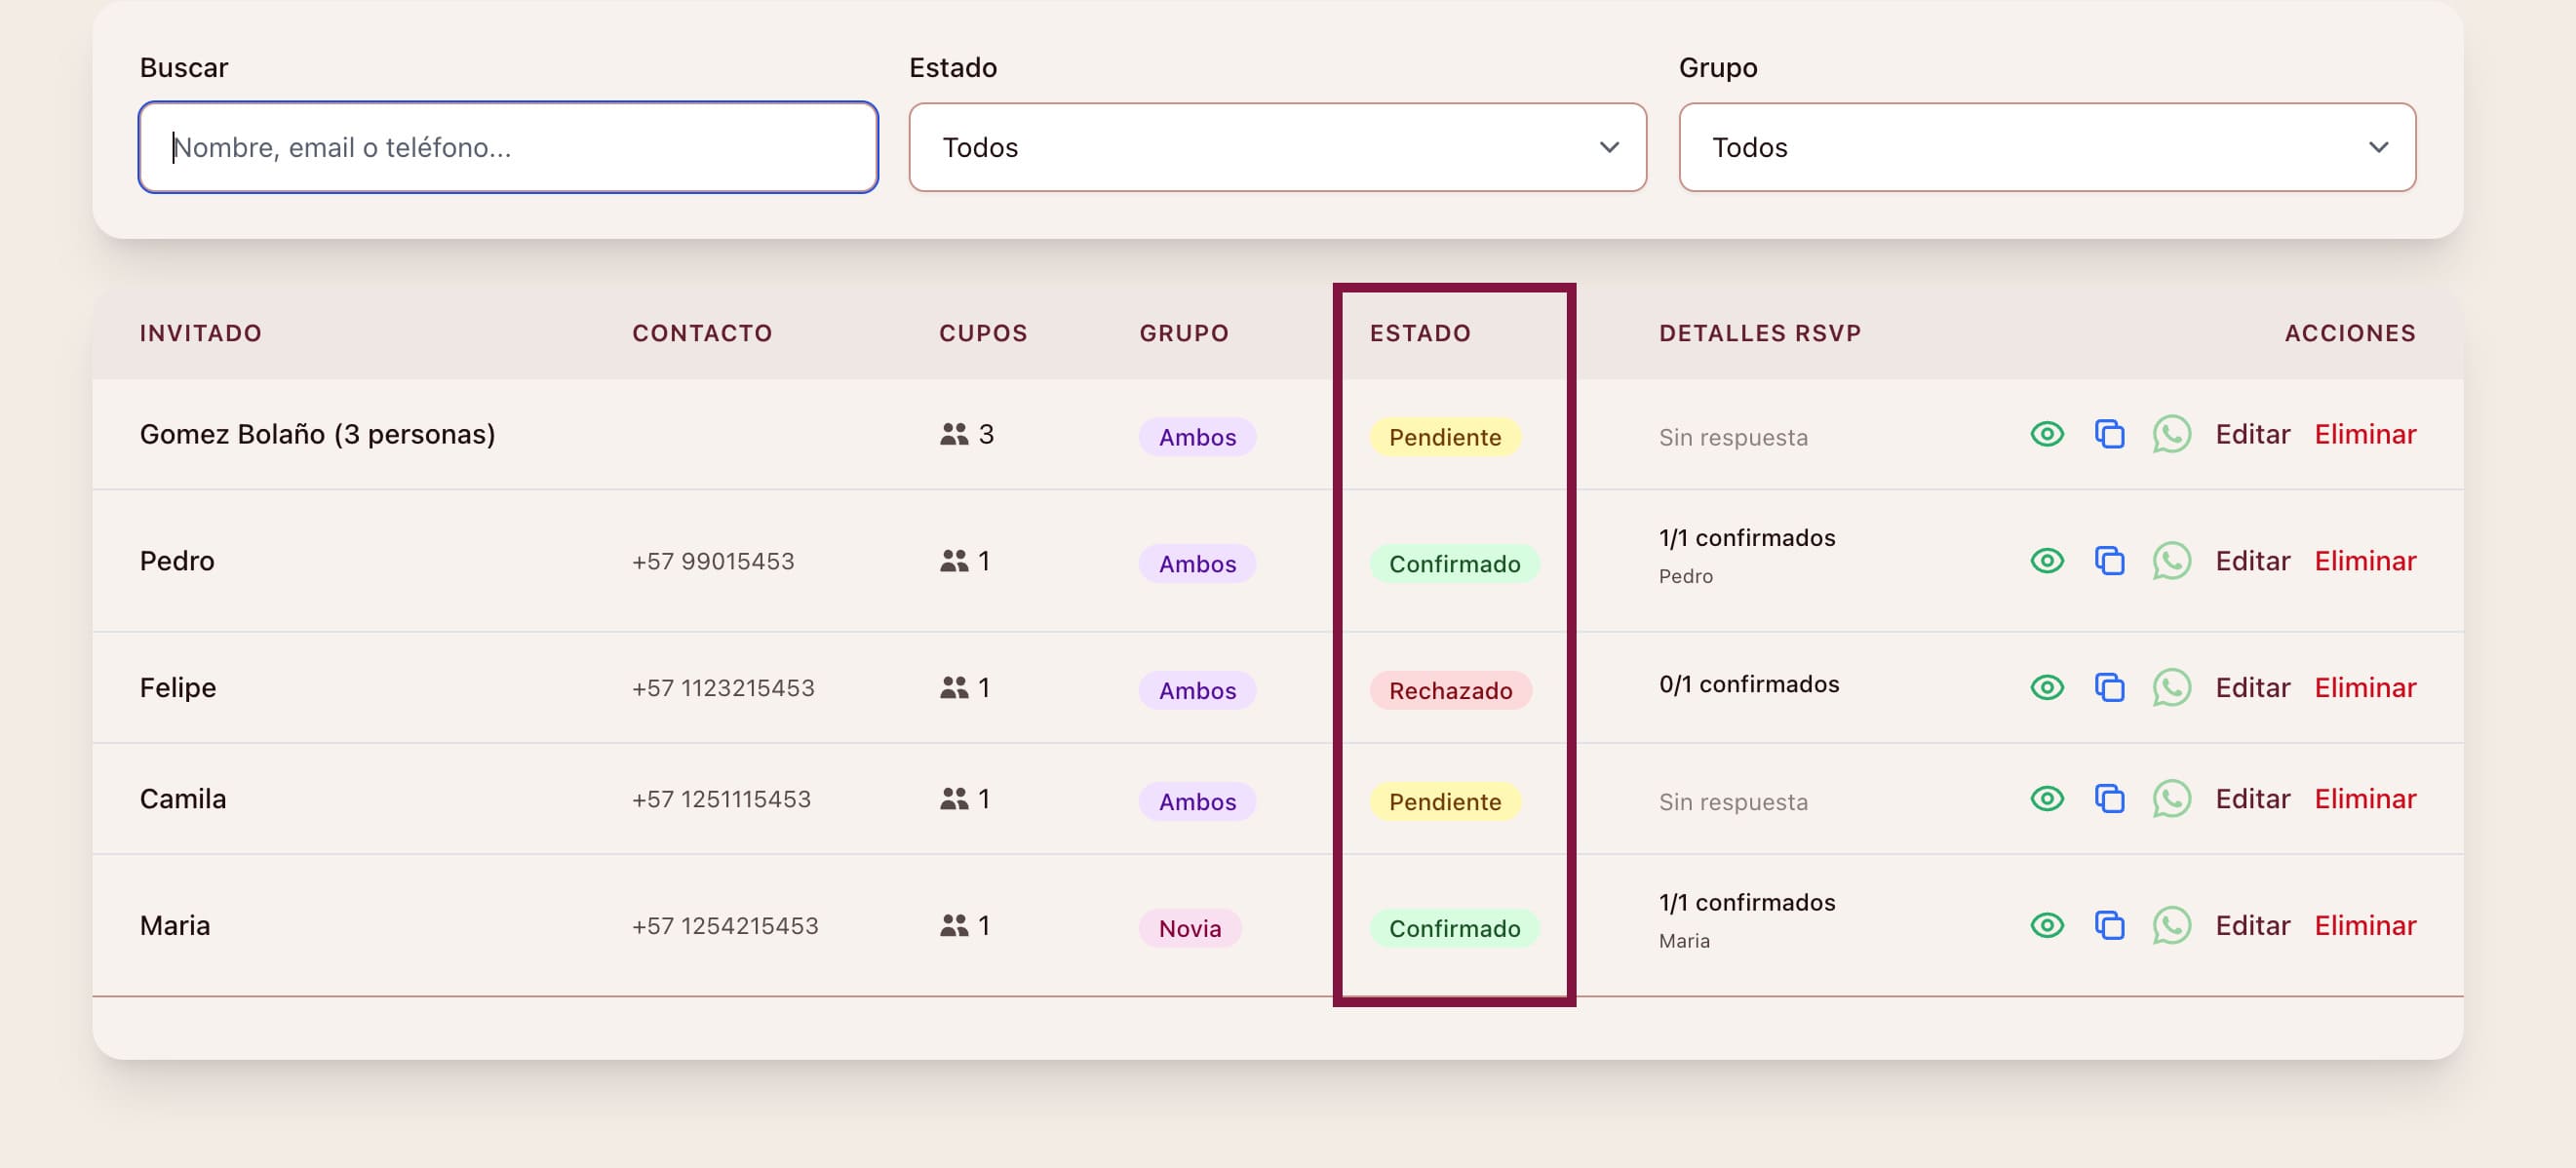
Step 5 — Monitor confirmations in real time
When your guests confirm attendance from their link, the status updates automatically in your dashboard. No calls, no WhatsApp groups, no confusion.
📸 
💡 Final tips
- Start organizing the list at least 3 months in advance — the more time you have, the less stress
- Check the spots before sending — make sure the number of people per invitation is correct
- Follow up after 10 days — if someone hasn't replied, a friendly WhatsApp reminder is usually enough
- Have a waiting list ready — if someone declines, you can invite someone from Tier C without delay
✨ Conclusion
Organizing your wedding guest list doesn't have to be torture. With a clear system from the start — well-defined groups, complete information and a tool that centralizes everything — you can have full control without stress.
At Nupcii you can create your digital wedding invitation, manage your guest list, send personalized links and see confirmations in real time, all from a single place.
✨ Because on your wedding day you want to be dancing, not reviewing an Excel sheet.
Ready to create your invitation?
Start free today. No credit card required.
Create my invitation for free